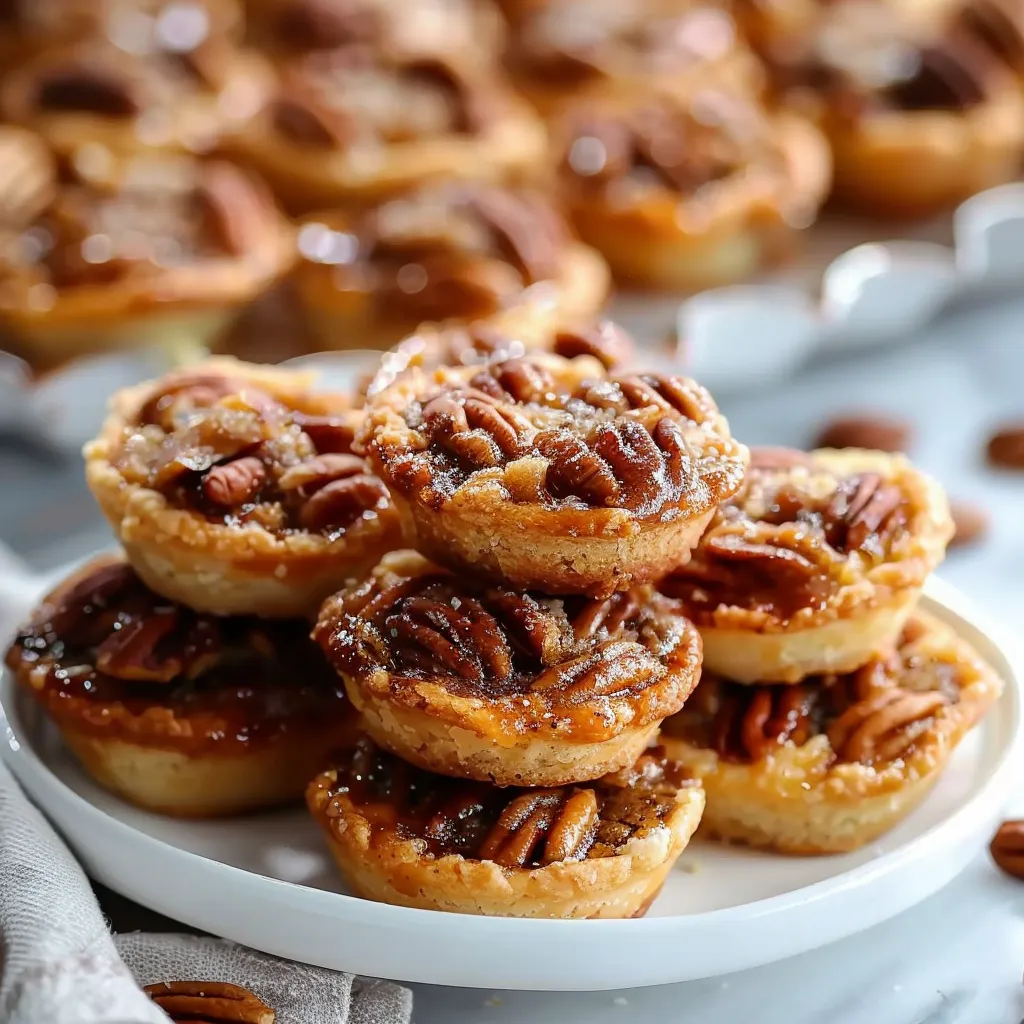
There’s something magical about cozying up on a chilly evening with a warm treat, isn’t there? I remember the first time I tasted Pecan Tassies at my grandma’s house during the holidays. The aroma of sweet, buttery crust mixed with the irresistible scent of pecans wafted through the air, luring me into the kitchen like a moth to a flame. Watching her bake was like watching a conductor bring a symphony to life — each ingredient gracefully coming together to create a perfect harmony. That’s what these delightful little bites are all about: comfort levels off the charts, and an irresistible sweetness that feels like a warm hug. If you’re looking for a treat that screams home, love, and a hint of nostalgia, look no further than this recipe!
Why You’ll Love This Recipe
Trust me, once you make these Pecan Tassies, they’ll become a staple in your baking repertoire. They’re quick to whip up, crowd-pleasing, and utterly delightful. Perfect for family gatherings, holiday parties, or just because you want something sweet to nibble on while you binge-watch your favorite show. Plus, they are tiny! Who doesn’t love a good bite-sized dessert? They also have this fantastic ability to blend well with whatever beverages you’re serving. Tea, coffee, or a glass of milk — they’ll make each sip feel like a treat. Seriously, you’ll be making these again and again!
What It Tastes Like
Picture this: buttery, flaky crust cradling a rich, gooey filling that marries the sweetness of brown sugar with the irresistible crunch of toasted pecans. You take a bite, and it’s a delightful dance of textures. The crust is tender, forgiving, and a tad crumbly — whispering sweet nothings before you reach the buttery filling that tingles your taste buds with deep caramel notes. Each mouthful is reminiscent of good times shared with loved ones on a crisp autumn day. It’s that first warm bite after a long day where everything feels just right. There’s really no better way to chase away the chill than with one (or three) of these tasty morsels!
Ingredients You’ll Need
Gathering your ingredients is half the fun! Here’s what you’ll be working with:
- 1 cup unsalted butter – Adds creaminess and richness to the crust.
- 2 cups all-purpose flour – Provides structure and tenderness.
- 1/4 cup granulated sugar – A little sweetness in the crust.
- 1 cup brown sugar – This gives the filling its deep, caramel flavor.
- 2 large eggs – Helps to bind everything together for that perfect gooeyness.
- 1 teaspoon vanilla extract – A splash of warmth and character.
- 1 1/2 cups pecans, chopped – The star of the show, adding crunch and nuttiness.
- 1/4 teaspoon salt – Balances out the flavors beautifully.
Optional Additions: You can switch things up a bit! Try adding chocolate chips for a bit of richness, or a hint of cinnamon for warmth. Even a dash of bourbon wouldn’t hurt if you’re feeling adventurous!
Special Garnishes: Drizzling these little beauties with chocolate or caramel syrup right before serving adds that little touch that impresses without much effort. You might even sprinkle some sea salt on top to contrast the sweetness. It’s a simple touch that wows!
Step-by-Step Instructions
Ready to bring these flavors together? Let’s get our hands a little messy in the best way possible!
- Prepare the crust: In a mixing bowl, beat together 1 cup of softened unsalted butter, 2 cups of flour, and 1/4 cup of granulated sugar until the mixture is well combined. It’ll be a bit crumbly but should stick together when pressed. Divide this dough evenly into a 24-cup mini muffin tin, pressing the dough into the bottom and up the sides to form a little cup.
- Pre-bake the crust: Preheat your oven to 350°F (175°C), and pop the crusts in for about 10-12 minutes until they’re lightly golden. You want them to firm up a bit but not overbake — nobody likes a hard crust!
- Make the filling: In another bowl, whisk together 1 cup of brown sugar, 2 large eggs, 1 teaspoon of vanilla, and 1/4 teaspoon of salt until well combined. Stir in your chopped pecans, mixing until everything is evenly coated.
- Fill the crusts: Once the crusts are slightly cooled, evenly pour the pecan filling into each cup. Don’t overfill them; leave a little room for the filling to puff up as they bake!
- Bake: Put the filled mini muffin tin back in the oven for an additional 20-25 minutes, or until the filling has set, and the tops are a lovely golden brown. The aroma will have your family wandering into the kitchen in no time!
- Cool and serve: Let them cool in the pan for a few minutes before transferring them to a wire rack. Trust me on this one — they can be a little delicate right out of the oven. Enjoy warm or at room temperature!
That’s it — pretty easy, right? Now, try not to eat them all at once!

Recipe Variations
If you want to play around with flavors, here are some fun variations:
- Chocolate Pecan Tassies: Add half a cup of chocolate chips into the pecan filling. You won’t regret it!
- Spiced Up: A pinch of cinnamon or nutmeg enhances the flavors nicely for a warm, cozy twist.
- Gluten-Free: Swap out the all-purpose flour for a gluten-free blend. It works beautifully!
You can also serve them with a scoop of vanilla ice cream on the side. Or, drizzle them with some caramel sauce for a fancy touch. Just let your creativity roam!
Serving & Storage Tips
To serve these little gems, plate them on a lovely dessert platter with a dusting of powdered sugar. Looks so elegant and inviting! For leftovers (if any survive), store them in an airtight container at room temperature for up to three days. If you want to enjoy them later, pop them in the fridge, and they should keep fine for about a week. For the ultimate comfort, reheat them in the microwave for about 10-15 seconds before serving — just until warm!
Helpful Tips
Now, let’s avoid some common pitfalls:
- Don’t skip chilling the dough; it really helps with the rolling!
- Keep your eye on those baking times — ovens can be sneaky.
- If you find your batter a bit too thick, you can add a splash of milk for a looser consistency.
Honestly, the first time I made these, I miscalculated the baking time and ended up with some overly crunchy crusts — learn from my mistake! They should be golden, not brown to ensure a tender bite.
Special Equipment
You’ll want a few handy tools to make this process smoother:
- Mini muffin tin: Essential for shaping those delightful tassies into bite-sized portions. A non-stick version helps a lot with the removal process.
- Mixing bowls: A couple of different sizes help when making the crust and filling separately.
- Whisk: Perfect for blending your filling to that smooth and lovely consistency.
Frequently Asked Questions
Can I freeze Pecan Tassies?
Absolutely! They freeze beautifully. Place them in an airtight container, and they’ll be good for up to a month. Just thaw them in the fridge or at room temperature when you’re ready to enjoy them.
Can I use other nuts in place of pecans?
You sure can! Walnuts or almonds would also work nicely. Just chop them up the same way, and you’ll have a slightly different yet delicious treat.
What’s the best way to store leftover tassies?
Store them in an airtight container at room temperature. They can be kept for about three days, but trust me, they’ll likely disappear long before that!
How can I tell when they’re done baking?
The filling should be set and not jiggly in the center. A golden top is another good indicator. But the best way? The smell wafting through your kitchen is a solid tell-tale sign!
Can I double the recipe?
Definitely! Just remember to adjust your baking pans accordingly. Having extra tassies around is never a bad idea!
Conclusion
So there you have it — a recipe that marries nostalgia with pure deliciousness. Pecan Tassies are more than just a dessert; they’re little bundles of happiness that will take you back to cozy evenings and cherished family moments. I can’t wait for you to give this a try — I know it will be a new favorite! Don’t forget to let me know how yours turned out in the comments below. Happy baking!
Print
Delightful Homemade Pecan Tassies Sweet Bites of Joy
Discover the joy of homemade Pecan Tassiesmini pecan pies bursting with flavor and simplicity Perfect for any occasion Try it today
- Total Time: 55 minutes
- Yield: 24 servings 1x
Ingredients
Instructions
Notes
Pecan Tassies are delightful bite-sized crusts filled with a rich, gooey filling of brown sugar and chopped pecans. The perfect warm treat for any occasion.
- Prep Time: 20 minutes
- Cook Time: 35 minutes
- Category: Dessert
- Cuisine: American
Nutrition
- Serving Size: 24 servings
- Calories: 120
- Sugar: 6 grams
- Fat: 8 grams
- Carbohydrates: 11 grams
- Fiber: 0.5 grams
- Protein: 1.5 grams
Keywords: Pecan, Tassies, Dessert, Recipe