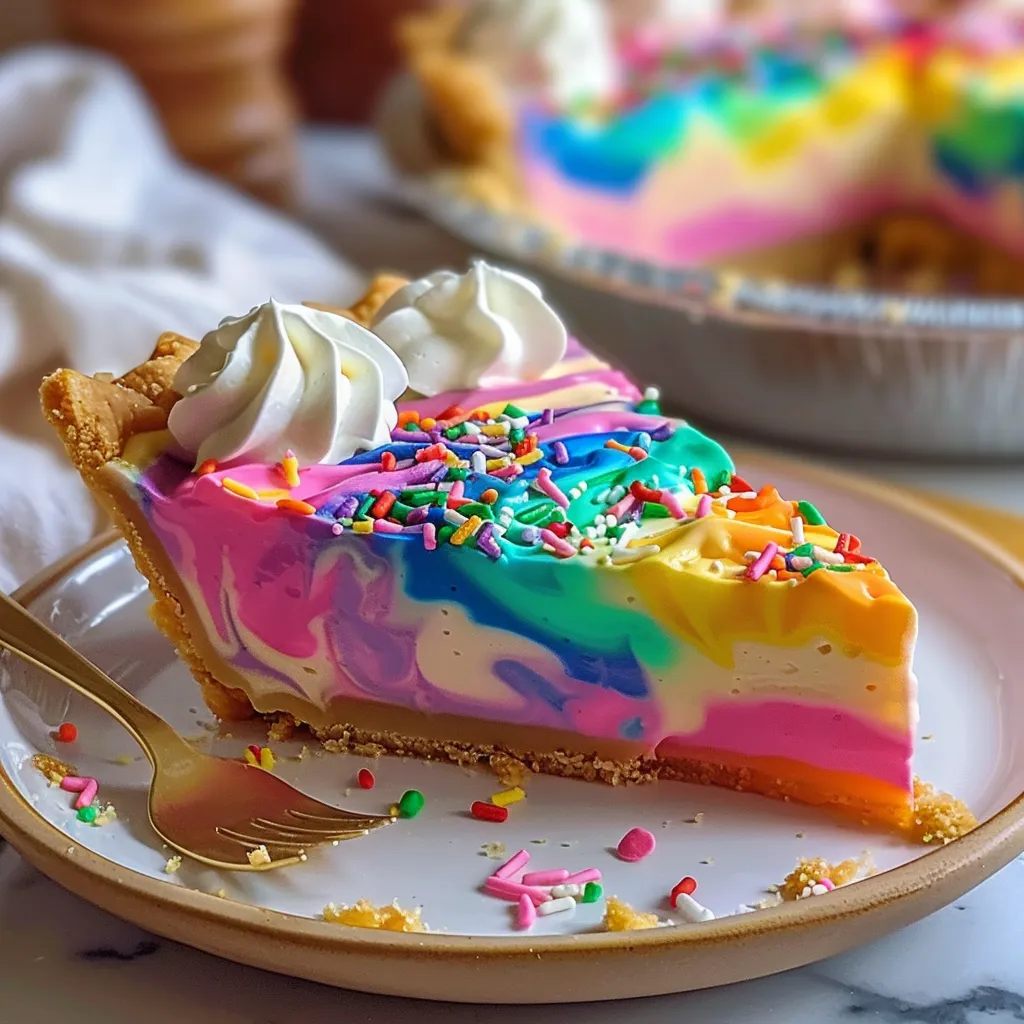
As the sun sets and the kitchen fills with the warmth of freshly baked goodies, there’s something undeniably magical about pie. I remember the first time I dove into making a pie myself — a bustling summer evening filled with laughter and chatter. My friends and I gathered around, a medley of excitement as we watched colorful ingredients transform into something enchanting. That’s where my love for colorful pies began! Today, I’m thrilled to share my recipe for the Magical and Easy Rainbow Pie. This isn’t just any pie; it’s a vibrant slice of joy that captures the essence of summer in every bite — easy to make, visually stunning, and deliciously refreshing.
Why You’ll Love This Recipe
If you’re looking for a dessert that brings smiles and evokes nostalgia, this Rainbow Pie is your answer. Picture this: a buttery, flaky crust cradling layers of colorful, fruity filling. It’s perfect for gatherings, birthdays, or just to brighten your day. What makes it soar above the rest is its simplicity. You don’t need to be a professional baker to master this pie — it’s straightforward enough that even the most rookie of cooks can shine. Plus, children and adults alike will love picking their favorite slice from a kaleidoscope of colors!
What It Tastes Like
This pie is like a burst of sunshine on a plate. The buttery crust hugs a creamy filling that wriggles with juicy, vibrant fruit flavors. Imagine biting into a slice and experiencing a sweet, tangy explosion — it’s refreshing, comforting, and a little cheeky. The texture contrasts beautifully, too; the crispy crust meets the smooth filling and juicy fruit in a delightful tug-of-war that dances on your taste buds. Honestly, it’s like that first warm bite of your favorite dessert after a long day, but with an added sprinkle of joy. It’s a celebration in every mouthful.
Ingredients You’ll Need
- For the crust:
- 1 ½ cups all-purpose flour – the foundation that gives our pie its flaky texture.
- ½ cup unsalted butter, chilled and diced – it adds richness and enhances the crust’s flavor.
- 1/4 cup powdered sugar – for a hint of sweetness!
- 1/4 tsp salt – it balances the flavors beautifully.
- 4–6 tbsp ice water – helps bind everything together without overworking the dough.
- For the filling:
- 1 cup strawberries, sliced – brings a bright, sweet note.
- 1 cup blueberries – adds a burst of juicy goodness.
- 1 cup kiwi, peeled and sliced – offers a zesty tang that’s refreshing.
- 1 cup whipped cream cheese – for that dreamy, creamy layer.
- 1/4 cup powdered sugar – to sweeten the cream cheese just right.
- 1 tsp vanilla extract – a warm, inviting undertone.
- Optional Additions:
- A sprinkle of cinnamon adds a cozy warmth.
- Chocolate drizzle on top for an extra treat!
- Special Garnishes:
- Fresh mint leaves for a pop of green.
- A dusting of powdered sugar for a glammed-up finish.

Step-by-Step Instructions
Let’s get that pie started! Follow these simple steps and unleash your inner baker:
- Make the Crust: In a large bowl, combine the flour, powdered sugar, and salt. Add in the diced, chilled butter. Using your fingers (or a pastry cutter if you have one), mix until it resembles coarse crumbs. Now, gradually stir in the ice water, one tablespoon at a time, until the dough holds together.
- Chill Time: Form the dough into a ball, cover it with plastic wrap, and pop it in the fridge for about 30 minutes. Trust me on this one — it’s where the magic happens!
- Preheat & Roll: Preheat your oven to 375°F (190°C). Once chilled, roll the dough out on a lightly floured surface into a circle about 1/8 inch thick. Carefully place it in a pie pan and trim the edges. Don’t fret if it looks imperfect — it adds character!
- Par-Bake: Poke the bottom with a fork (this prevents bubbling) and bake for about 10-12 minutes until lightly golden. Let it cool.
- Prepare the Filling: In another bowl, mix the cream cheese, powdered sugar, and vanilla until smooth and creamy. Spread this luscious mixture evenly over the cooled pie crust.
- Layer the Fruit: Now comes the fun part! Arrange your colorful fruit slices over the cream cheese layer. Get creative — it doesn’t have to be perfect, just vibrant and fun!
- Chill Again: Refrigerate the pie for at least 2 hours to let all those flavors meld. It’s worth the wait!
That’s it — pretty easy, right?
Recipe Variations
Feeling playful? Here are some fun twists to consider:
- Swapping fruit: Use whatever seasonal fruit you have on hand! Think peaches, raspberries, or even mango.
- Dairy-free? Substitute the cream cheese with a vegan alternative (look for cashew or almond-based options).
- Make it a chocolate crust by using cocoa powder in place of some flour — chocolate and fruit? Yes, please!
Serving & Storage Tips
To serve, slice generously and top with a dollop of whipped cream or a drizzle of chocolate if you’re feeling fancy. This pie is best enjoyed fresh, but if you have leftovers, don’t worry! Store it in an airtight container in the fridge for up to 3 days. To repurpose, consider layering the remaining pie bits with yogurt and granola for a delightful breakfast parfait! Heavenly, right?
Helpful Tips
Even the best bakers have their off days, so here are a few insights to ensure your Rainbow Pie turns out perfect:
- Don’t skip chilling the dough. It helps with the flakiness and makes it easier to handle.
- Overbaking the crust is a common trap — keep an eye on it, and take it out when it’s golden, not brown.
- Feeling uncertain about the cream cheese mixture? Taste it! Adjust the sweetness to your liking.
Special Equipment
- Pie Pan: A standard 9-inch pie pan will do just fine, but a glass one allows you to see that beautiful crust bake perfectly!
- Rolling Pin: It’s your best friend when rolling out that dough, ensuring an even thickness for a lovely crust.
- Pastry Cutter or Fork: Use this to mix in the butter into the flour, making the perfect crumbly texture.

Frequently Asked Questions
Can I use frozen fruit for the filling?
Absolutely! Just make sure to thaw and drain excess liquid before using. Fresh or frozen, both work great!
Can I make the crust ahead of time?
Yes, you can prepare the crust a day in advance and store it wrapped in plastic wrap in the fridge. Just let it sit at room temperature for a few minutes before rolling out.
What’s the best way to cut the pie without messing up the layers?
Use a sharp knife or a pie server. Wipe the knife clean between slices to keep it looking beautiful!
Can I add a different flavor to the cream cheese filling?
Definitely! Consider adding lemon zest or a splash of almond extract for a fun twist.
How do I know when the pie is set?
Once it’s chilled and the filling looks firm but still a bit wobbly, you’re good to go! Remember, it will set more as it cools.
Conclusion
The Magical and Easy Rainbow Pie is more than just a dessert; it’s a slice of happiness, a rainbow of flavors, and a beautiful way to celebrate the joys of cooking. I can’t wait for you to try this recipe — it’s a peppy addition to any table! Remember, every pie tells a story, so be sure to share yours in the comments. Cheers to colorful delights and the joy of sharing food with loved ones!
Print
Deliciously Easy Rainbow Pie Recipe for a Colorful Treat
Create a vibrant dessert with our Magical and Easy Rainbow Pie recipe Colorful layers and simple ingredients make it perfect for weeknights Try it today
- Total Time: 2 hours 42 minutes
- Yield: 8 servings 1x
Ingredients
Instructions
Notes
This Magical and Easy Rainbow Pie is a vibrant slice of joy that captures the essence of summer in every bite — easy to make, visually stunning, and deliciously refreshing.
- Prep Time: 30 minutes
- Cook Time: 12 minutes
- Category: Dessert
- Cuisine: American
Nutrition
- Serving Size: 8 servings
- Calories: 250
- Sugar: 15g
- Fat: 12g
- Carbohydrates: 36g
- Fiber: 2g
- Protein: 3g
Keywords: Rainbow Pie, easy dessert, summer pie, colorful pie, fruity dessert