As the crisp autumn air begins to weave into our days, there’s something special about gathering around the kitchen to conjure up treats that celebrate the season. Among the bubbling cauldron of ideas for festive goodies, there’s a recipe that stands out, each bite promising a mischievous delight: Witch Hat Halloween Cookies. I remember the first time I made these whimsical sweets with my kids, the laughter echoing through the house as we draped colorful candy over each cookie like they were little hats adorned just in time for a spooky soirée. There’s magic in the memories we create in our kitchens, and I guarantee these cookies will become part of your Halloween traditions, just as they have become part of mine.
Why You’ll Love This Recipe
Honestly, who wouldn’t adore a cookie that looks a bit like a witch’s hat? These cookies are not just adorable; they are incredibly easy to make, making them perfect for both seasoned bakers and kitchen novices alike. With simple ingredients and a dash of creativity, you’ll have a fun, festive treat that’ll leave your guests (and little trick-or-treaters) raving. Plus, they’re a delightful way to involve kids in the kitchen — they can help assemble and decorate! And let’s be real; they’re so cute you’ll probably want to whip them up every Halloween.
What It Tastes Like
Picture this: a soft, buttery cookie with a hint of vanilla, almost melting in your mouth. The rich chocolate kiss adds a delightful depth, contrasting beautifully with the sweetness of the icing. The crunch of the candy corn on top brings a satisfying texture, like a little surprise with every bite. It’s sweet, just the way you want holiday treats to be, and the combination of flavors is comforting — like that first warm bite after a long day. Sharing these cookies is like sharing a bit of seasonal joy.
Ingredients You’ll Need
- 1 cup unsalted butter (softened): Adds that creamy richness we all love in cookies.
- 1 cup granulated sugar: Sweetens the cookies pleasantly, creating a tender texture.
- 1 egg: This helps bind everything together, providing structure and moisture.
- 2 teaspoons vanilla extract: Infuses an irresistible aroma and flavor.
- 2 ½ cups all-purpose flour: The backbone of the cookies — creates that soft, chewy texture.
- 1 teaspoon baking powder: Gives the cookies a nice lift.
- 1/2 teaspoon salt: Balances the sweetness perfectly.
- Chocolate kisses (unwrapped): These are the “hats” that make your cookies look so cute.
- Candy corn: Add a festive flair and a bit of fun crunch to the top of each cookie.
- Colored icing (for decorating): This is where you can let your creativity shine!
Optional Additions: Ever tried these with a touch of orange zest? It’s a game changer! You could also experiment with dark chocolate kisses or even create ghostly decorations with white icing.
Special Garnishes: Drizzling some melted chocolate around the base of the kiss adds a professional touch that will wow your friends.

Step-by-Step Instructions
Ready to dive in? Let’s start crafting these magical cookies!
- Preheat your oven to 350°F (175°C). This will make sure your cookies bake evenly.
- In a large bowl, cream together the softened butter and granulated sugar until it’s light and fluffy—this usually takes about 2-3 minutes. Don’t rush this part; it’s where the magic happens!
- Add in the egg and vanilla extract, mixing until well combined.
- In a separate bowl, whisk together the flour, baking powder, and salt. Gradually incorporate this dry mix into your wet mixture, stirring until just combined. You want to avoid overmixing it; a few lumps are totally okay!
- Using a cookie scoop or a tablespoon, drop dough onto a parchment-lined baking sheet, leaving enough space for them to spread.
- Bake for 10-12 minutes or until the edges are lightly golden. Remember, the cookies will continue to cook a bit after you take them out, so don’t wait for them to turn brown!
- Let them cool on the sheet for a few minutes before transferring to a wire rack.
- Once cooled, take a chocolate kiss and gently press it into the center of each cookie—this is where they really start looking like witch hats.
- Decorate the base of the chocolate kiss with some colored icing, then place a piece of candy corn atop for that final touch!
That’s it — pretty easy, right?
Recipe Variations
Want to mix things up a bit? Here are some quick ideas: try adding spices like cinnamon or nutmeg for a cozy twist. Or, swap the kiss for a mini peanut butter cup for a nutty surprise! If you’re looking for a healthier take, use almond flour for a gluten-free version, just remember to adjust the quantities slightly since almond flour behaves differently than all-purpose flour. The creative possibilities are endless!
Serving & Storage Tips
These cookies are best enjoyed fresh, but they store beautifully too! Keep them in an airtight container at room temperature for up to a week — if they last that long! If you need to soften them after a few days, just pop them in the microwave for a few seconds. You can also freeze the cookie dough for a rainy day; just shape your dough scoops and freeze them on a baking sheet before transferring into a freezer bag. When you’re ready, bake them straight from the freezer, adding an additional couple of minutes to the baking time.
Helpful Tips
I remember burning the first batch of my Witch Hat Cookies because I got distracted! It happens, but here’s a little tip: keep an eye on them during those last few minutes of baking. To prevent your kisses from melting into puddles, press them into the cookies right after they come out of the oven for the perfect shape! Oh, and don’t forget to have fun decorating — it’s all part of the Halloween spirit, after all!
Special Equipment
While you don’t need much to whip these up, here are a couple of tools that can make your life easier:
- Cookie scoop: Helps ensure your cookies are uniform in size, which means they’ll bake evenly.
- Parchment paper: Lining your baking sheets with parchment makes cleanup a breeze and keeps cookies from sticking.
- Cooling rack: This is essential for letting your cookies cool evenly without getting soggy on the bottom.

FAQ
Can I use a gluten-free flour for this recipe?
Absolutely! Just make sure to choose a blend designed for baking to get the best texture.
How long do these cookies last?
In an airtight container at room temperature, these cookies should last about a week. But trust me, they’ll likely be gone long before then!
What’s the best way to store leftover cookie dough?
You can freeze cookie dough for future use! Just scoop out the dough, freeze until solid, then transfer to a freezer-safe container. Bake from frozen when you have a craving!
Conclusion
There you have it! Witch Hat Halloween Cookies are delightful little treats that are sure to bring smiles and warmth to your Halloween festivities. They’re not just cookies; they’re a way to create memories with your loved ones — filled with laughter and joy. I hope you give this recipe a try soon and that it finds a special place in your Halloween traditions. And, hey, when you do make them, don’t be shy! Share your creations in the comments. I’d love to hear all about your kitchen adventures — maybe even your decorating tips!
Happy baking, and may your Halloween be filled with magic and treats!
Print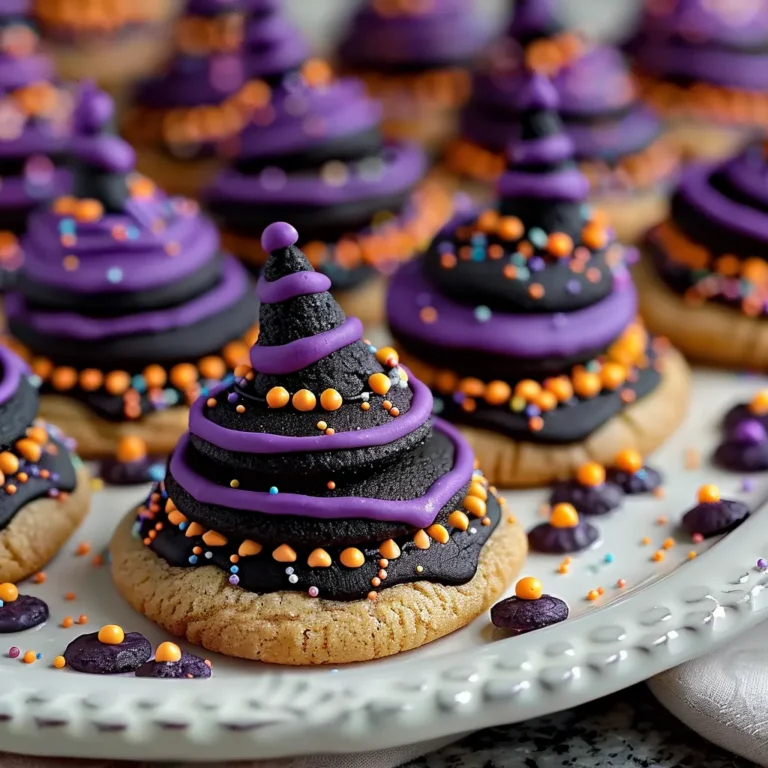
Irresistible Witch Hat Halloween Cookies Bake Spooktacular Treats
Bake spooktacular Witch Hat Halloween cookies with easy recipes that delight Get tips for creating these fun festive treats for your celebration
- Total Time: 32 minutes
- Yield: 24 cookies 1x
Ingredients
Instructions
- Prep Time: 20 minutes
- Cook Time: 12 minutes
- Category: Dessert
- Cuisine: American
Nutrition
- Calories: 120 calories
- Sugar: 9 grams
- Fat: 5 grams
- Saturated Fat: 5 grams
- Carbohydrates: 18 grams
- Fiber: 0 grams
- Protein: 1 gram
Keywords: Witch Hat Halloween Cookies, Halloween Desserts, Easy Halloween Recipes, Fall Baking